Browsing 'Game Design': Posts from either of the Game Design programs
A few weeks of game design
So a few weeks has passed and a lot has happened so I am going to try to summarize a bit.
I have learned quite a bit but as usual, the more you learn the more you realize you do not know. But the thing with game design, I think, is that no matter how much you read from books or learn from lectures you still have to try it out. That is where you learn the most. Luckily I have […]

3D I, Week 6, Part 3: Assignment 2 Update
This is, again, a late blog report on my Assignment 2 necklace. Following up on my previous post, this is a short and simple post on my final model and its textures.
Above is my final model rendered in UDK with the diffuse, specular and normal textures on.
My diffuse texture has the simple patterns of each of my pearls. To go with my simplified cartoony style, I kept the colors limited, and used a lot of contrast between […]
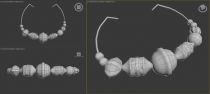
3D I, Week 5, Part 2: Assignment 2 Update
This is a long overdue blog report on the progress of my Assignment 2 necklace.
In this post, I will showcase my final model, along with the UV and a WIP texture. I’ll follow up with another post showcasing the final set of textures.
Above is my final model for this necklace with a polycount of 2088 tris. With a somewhat flexible polycount limit of 1000 to 3000 tris, I tried to keep my modeling simple but still modeled out some […]
Paper prototype feedback and more
So, in the last week we receieved feedback on our paper prototype.
Our prototype wasn’t really up to par, but it seemed that our general idea about the game came through regardless, we also received a lot of really good feedback on things that we could include or improve on the concept, which was great!
I am feeling we are on the right track so far, still, there is always room for improvement ofcourse, nothing will ever be perfect.
So, now… To our […]
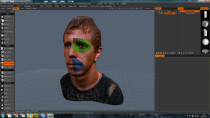
Week 43: 3D Scanning and Photogrammetry
Another week, another tool introduced to us. Through the duration of this week we have been focused on the application of 3D scanning, specifically on a facial structure.
3D Scanning
Using 3D Coat, I was able to utilise a photo from 123D Catch and apply a mesh manually using said 3D reconstruction as reference. It is a fairly straight forward process. Using 123D Catch, you insert photos of whatever object you have chosen (a face in this case) in a way that […]

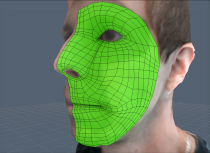
3D week 08 – Facial modelling
Hello!
This week has been about modelling faces. We talked about different methods of creating facial meshes and theoretical about edge-flow and topology for facial projects.
One faster and simpler ways of convert real life object to digital 3D meshes is by scanning them by simply photograph the object from all the right, necessary and different angles. The photos need to cover all of the faces, edges and angles that you want to have on your 3D mesh later on.
When all photos […]